
Virtual event consumption provides a unique problem that in-person events don't have; you cannot verify someone's attendance. At a physical venue, you may have designated volunteers who can validate session attendance via QR scan or manual check-in. This is especially important if the event requires attendance in order to earn applicable CEUs.
However, with Eventsquid, you can still verify session attendance using our Virtual Event Organizer. The Virtual Event Organizer (VEO) is designed to curate the live streaming links, static video links, speakers, sponsors and other event content within a single online destination.
The purpose of this article is to provide an understanding of the different ways an attendee can check into/out of a session within the VEO.
GOALS OF CHECK-IN
To recap, as an event host, there are many reasons you may want to track item level check-in. The most common goals of check-in are:
- Validate real attendance of a specific activity or session
- Condition CEU awards based on real session attendance
- Gain insight as to which sessions attendees are most interested in at your event
METHODS OF VIRTUAL CHECK-IN
With Eventsquid's Virtual Event Organizer, you can enable attendees with a mechanism for checking themselves into and out of sessions. There are two methods of self check-in that you can enable within the VEO:
- Check-In Codes
- Auto Check-In
1) CHECK-IN CODES
When using Check-In Codes, you can designate two unique codes for a given session (registration item): one for check-IN and the other for check-OUT (you can elect to ONLY offer a check-IN code if preferred).
CONFIGURATION & SETUP: CHECK-IN CODES
Check-in codes can be configured in either the Education Credits area, or the Scheduling Grid.
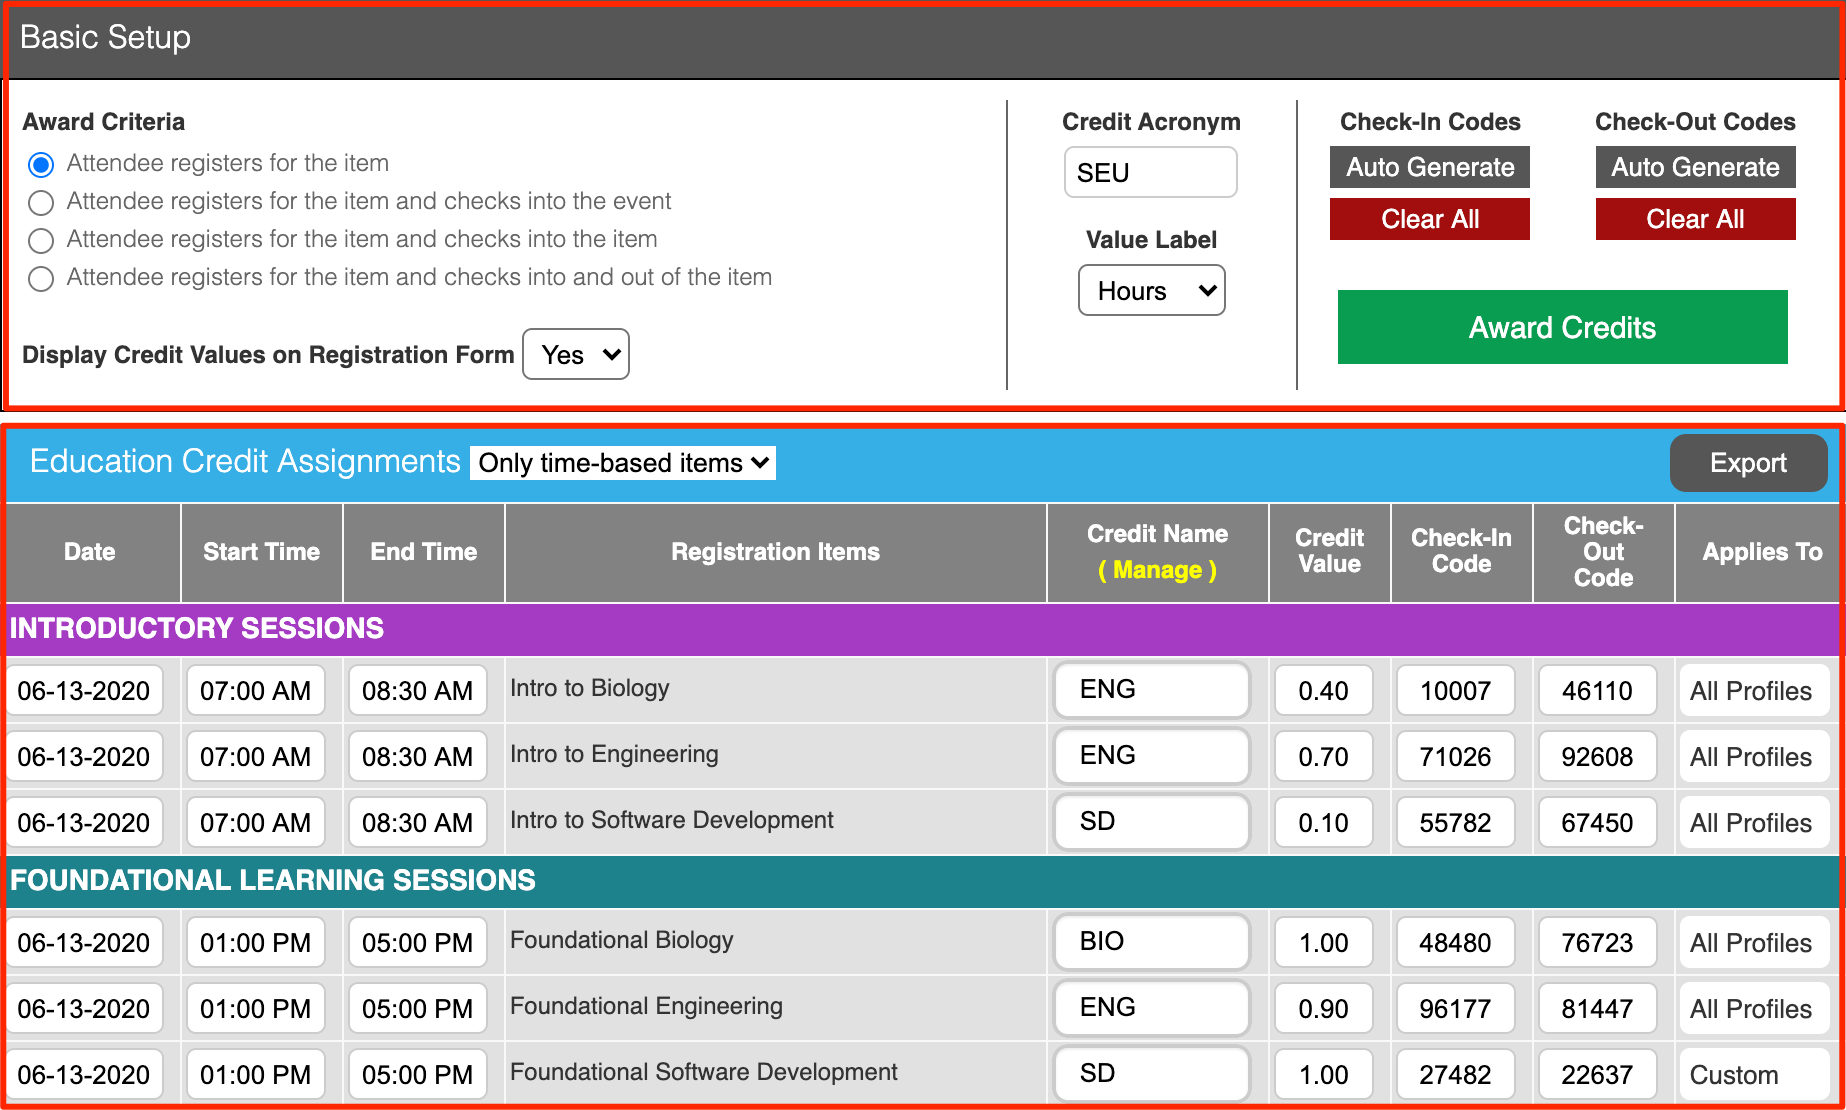
Education Credits
To configure check-in codes within the Education Credits area, navigate to the REGISTRATION section in the Event Builder and select the Education Credits tab. Each of your sessions will be displayed in the grid below where you can add a Check-In Code and Check-Out Code.
Instead of manually adding each code, you can also use the AUTO GENERATE buttons at the top of the CEU Grid to generate a randomized 5-digit check-in code for all registration items and the same for check-out. There are also buttons to clear all codes if needed.
TIP: You might consider using the Auto Generate and Clear functions to keep rotating codes throughout the course of your event. This may prove to be a useful tool in preventing attendees from sharing codes amongst each other.
After entering codes for your sessions, you may want to enforce Award Criteria as well. In the upper left corner of the Education Credits area, you will notice 4 radio buttons, each with a different set of conditions. When activated, attendees must meet the check-in criteria in order to earn CEU hours.
If using session check-in, the Award Criteria may prove to be a valuable resource in enforcing session attendance amongst participants.
For more information on Education Credits, please visit Education Credits, CEUs and How to Setup & Communicate.
Scheduling Grid
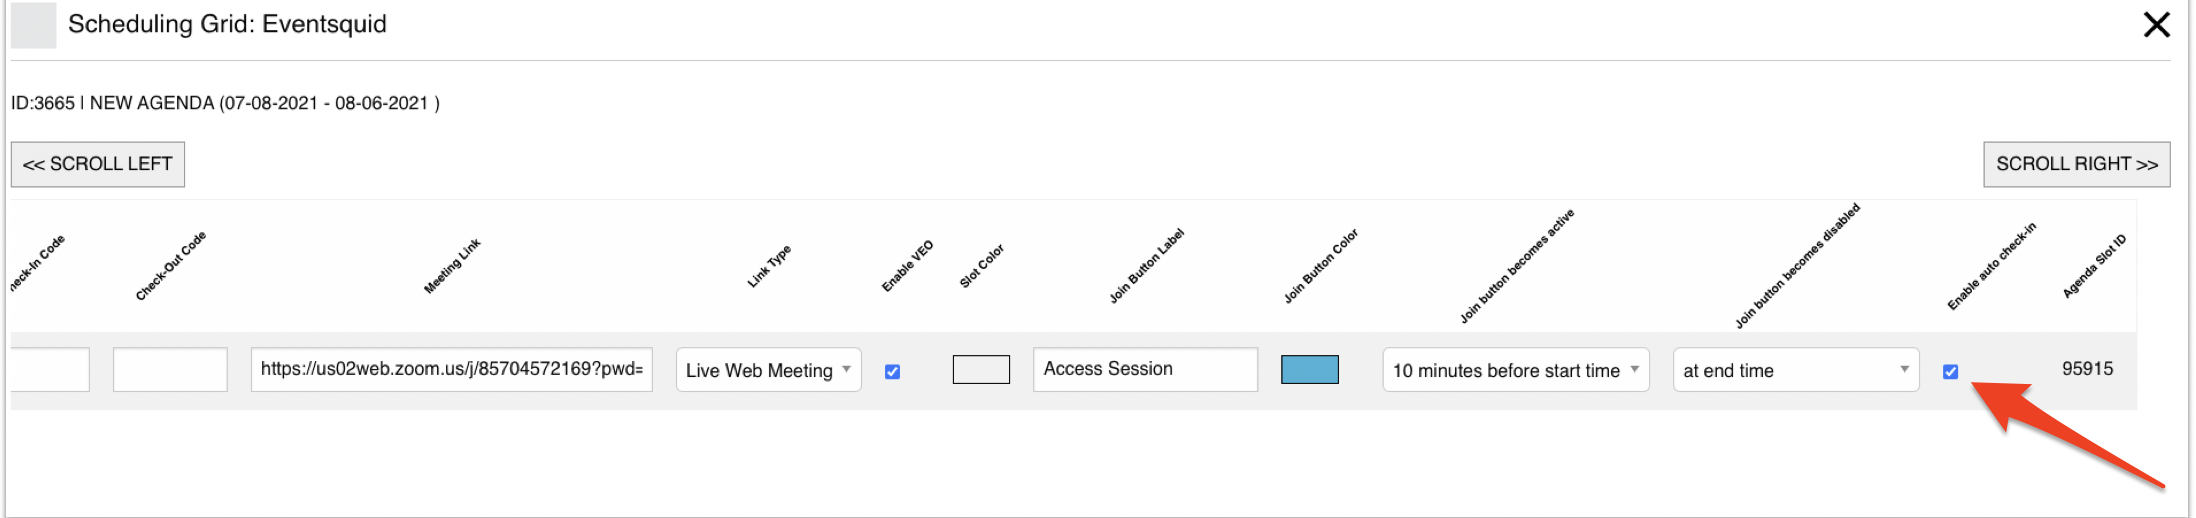
Check-In Codes can also be configured in the Scheduling Grid. The Scheduling Grid utility is the area in which your VEO agenda is constructed. You can utilize the Scheduling grid for code assignments along with any other adjustments to your virtual event schedule.
To access the Scheduling Grid, navigate to the EVENT DAY section in the Event Builder and select the Scheduling Grid tab. Click the Launch Scheduling Grid button to access the grid shown below.

ATTENDEE EXPERIENCE: CHECK-IN CODES
Clicking on a session within the VEO takes the attendee to the session’s landing page, where the attendee can review times, continuing education credit information, speakers, downloadable resources and sponsors.
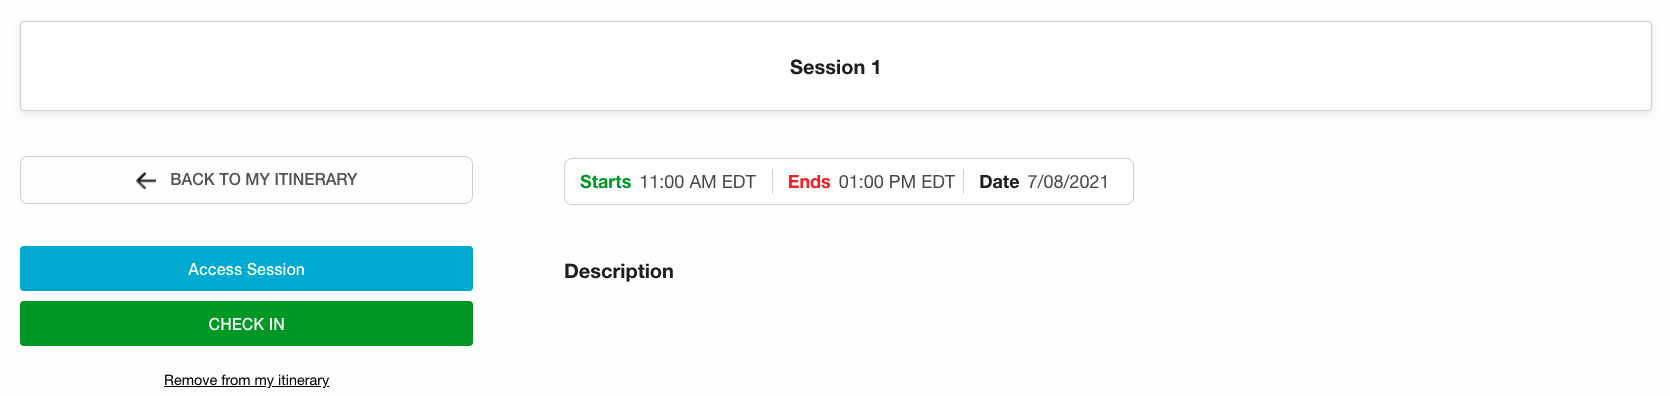
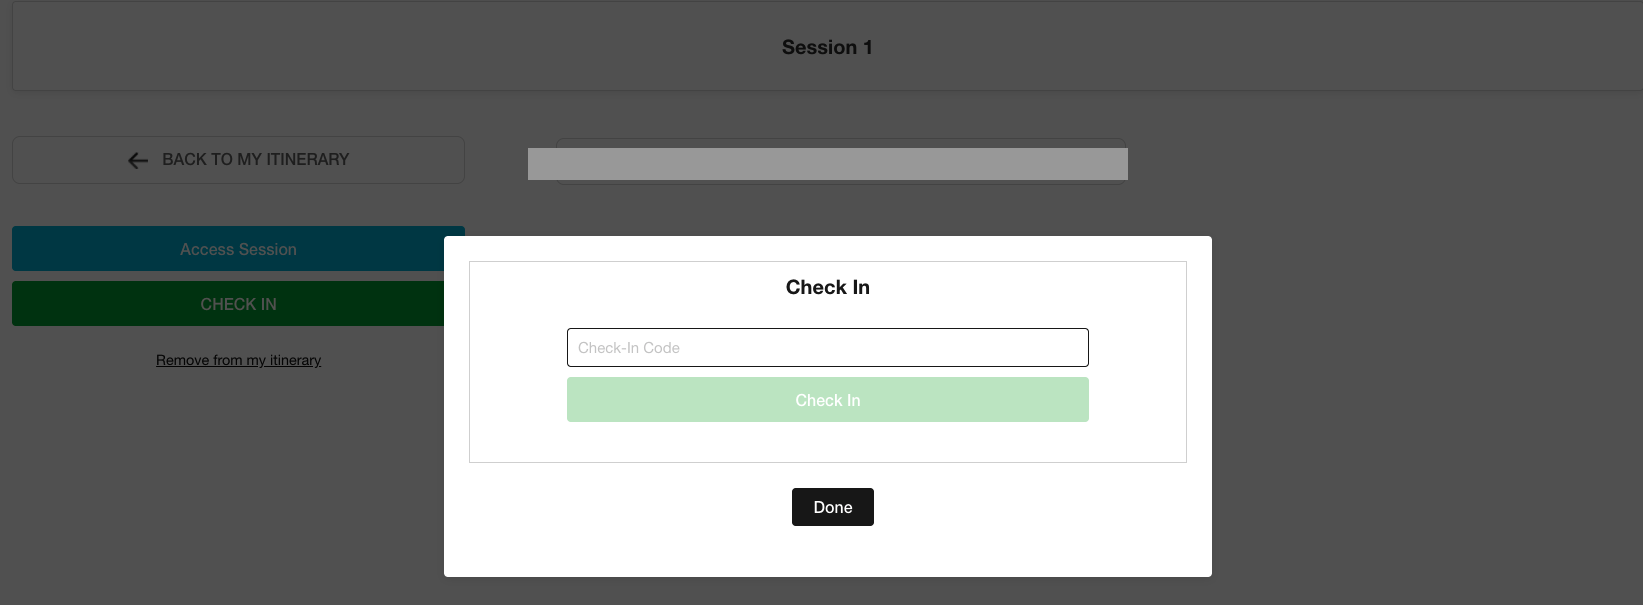
If an attendee is registered for the session, and check-in codes are enabled, the green CHECK-IN button will be displayed below the button used to join the virtual meeting. Clicking the CHECK-IN button will reveal the check-in code text box. Attendees will simply enter the code that was previously communicated to them and click Done to check themselves in.
2) AUTO CHECK-IN
Auto Check-In makes the check-in process very simple for attendees. Auto check-in does not require you to set up various check-in codes for each session. Auto check-in also eliminates the need for you to communicate the codes to attendees.
CONFIGURATION & SETUP: AUTO CHECK-IN
Auto Check-In is configured within the Scheduling Grid utility. To access, enter the Event Builder, then select the EVENT DAY tab at the top. Click the Scheduling Grid tab on the left and launch the utility using the button on the page.
In order to enable auto check-in for a given session, that session must first be enabled within the VEO environment. To enable a session, first add a live or recorded meeting link. Then, check the box ENABLE VEO.
Once enabled, scroll to the far right side of that sessions settings row. You will see a check box ENABLE AUTO CHECK-IN. This box is selected by default; however, you won't see this option available if you session already has check-in and/or check-out codes assigned. Of course, you cannot have both check-in codes and auto-check in simultaneously enabled.
ATTENDEE EXPERIENCE: AUTO CHECK-IN
Auto check-in does not require attendees to take an additional step in order to check into a session.
When auto check-in is enabled, attendees will not see the green CHECK-IN button, they will only see the button to join the session. The action of joining the session will automatically check the attendee in for that session.
NOTE: There is no auto check-out. When Auto Check-In is required, check-out is not an offered function.
Check-In Methods and Awarding CEUs
There are four different levels of award criteria; each successive level enforces incrementally stricter guidelines for obtaining/earning credits. Which Check-In method you choose has a direct impact on how you can award Education Credits. There is no right or wrong method, however, each method does have its own advantages and disadvantages depending on which aspect is most important to you.
Check-In Codes
- Codes must be configured for each registration item requiring check-in
- Codes must be communicated to attendees
- Allows for an added layer of security, as you can require attendees to both check in/out to earn credit
Auto Check-In
- Codes do not need to be configured or communicated to attendees
- Creates a very simple user experience
- Eliminates the ability to require attendees to check-out to earn credit